The Northeast kingdom railroad


Using Styrene For Backdrops
ne of the great things about the hobby of model railroading is the many different types of projects that are involved in building a layout and the many different ways of getting them accomplished. There is not always a right way or wrong way, but sometimes a different way that may work better for a given task. Here is how I constructed the backdrop for my layout. Perhaps you will find something in my approach that may work in your situation
When I started the benchwork for my new layout, I knew I would have to address creating the backdrop pretty soon. I didn’t want to get too far along only to have to start constructing and painting a backdrop over top of an existing layout. There are plenty of tried and true methods to build a backdrop. My layout is along multiple walls and also has a center peninsula. I was careful in preparing the room to make sure I could use the drywall as a backdrop for the sections along the wall. However, that still left me contemplating what to do about the corners and the peninsula.
On other layouts I have built or worked on, the backdrop has been as simple as blue paint on the wall to a more complex construction of Masonite hardboard flowing completely around the perimeter. Certainly I could use hardboard, but it seemed like a lot of work and expense, especially given that my drywall was already smooth and primed. It would help solve the issue with the corners and the peninsula but I was concerned about getting it to curve sharply in corners and then concealing the seams.
One day I was looking at the web site for Mike Dodd’s HO Virginian layout. It has lots of neat stuff, but what really caught my eye were his photos of his backdrop. He was using styrene. Now this seemed like a good idea. Styrene is smooth, stable, flexible and it is something I am already familiar working with. Mike’s website also had some neat ideas about how to construct the backdrop from styrene. I had found a different approach that would work for my layout.
The first order of business was getting styrene to use. I have read before about model railroaders getting large sheets of styrene for projects as a way to save money. So I put the question out to the New Jersey Division e-mail list to see if anyone had experience purchasing big sheets of the stuff. After getting a few “Why use that, hardboard is better!” replies, I did get some useful info about locations and prices. Another good source is to check in the yellow pages under plastics.
I called a nearby supplier and found out that they currently had .060” white styrene in stock in white. What is available in thickness and color varies, so you may need to try more than one supplier. The next problem I ran into was that they normally did not do small retail orders and could only take a credit card. At first they suggested finding more people to make a larger order, but finally I did manage to talk them into selling me just two 4’ x 8’ sheets. These were a little under $20 each. These can easily be rolled up to fit in your car.
May/June 2004
MER Local
This is an article I wrote for the MER Local. It details my use of styrene for the backdrop for my model railroad. This article was published in the May/June 2004 issue of the Local.
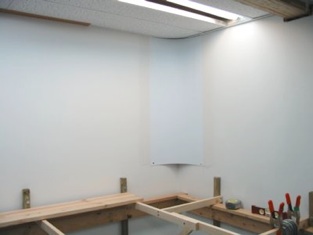
My center backdrop curved and tied into a drywall wall. I used the same method as the corner, curving it, marking the location for the Velcro and then attaching it and transitioning with joint compound.
I have only put up one side of the backdrop so far as I am only working on that section at this time. But the other side is ready to go at any time using the same method.
I found that the styrene takes latex paint well from a roller, but it takes longer to dry than drywall, so be careful to wait long enough before applying additional coats.
Hopefully you can find some of the ideas here useful for your layout. Look over the pictures and if you have any questions or want to see more detailed photos, feel free to e-mail me.
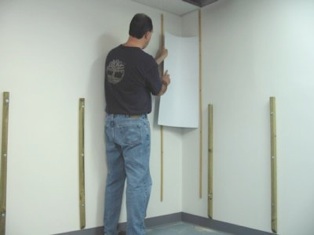
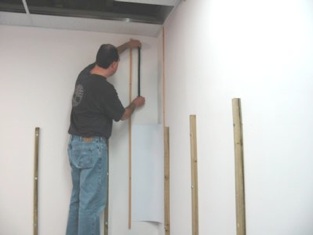
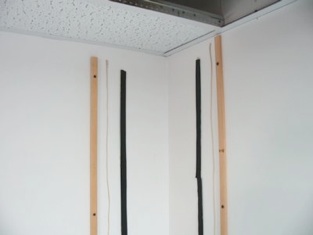
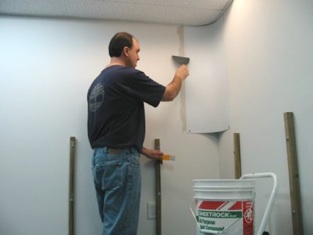
My first use of the styrene was to curve the 2 corners of my layout area along the drywall. After a little experimentation, I found that a piece of styrene 22” wide worked well pressed into the corner and ending up flush with the drywall on each side. I cut the piece large enough to reach from the drop ceiling to below the anticipated scenery. Now I needed to determine a method for securing each piece to the walls. I didn’t want to ruin the surface with screws but I did want something strong enough but slightly flexible. Mike Dodd’s web site said that he used self stick Velcro strips to secure styrene to vertical supports (more on these later). I decided to try this for attaching to the drywall. The strips stuck well to the wall and the styrene and helped transition the curve into the flat wall.
To hold the styrene in place while I worked, I screwed pieces of wood strip on either side of the corner. I used ¾” spline from my sub-roadbed supply. Make sure they are plumb and parallel. I curved the styrene into place and let the wood strips hold it in place. I marked on the wall below the point where the gap between the wall and the styrene was about the thickness of the Velcro strips. I removed the styrene and then made a perpendicular line off of each mark. I removed the backing on one side of the Velcro and applied it along each line, pressing firmly in place. Not relying just on the Velcro, I also ran a bead of Liquid Nails about halfway between the Velcro and the wood. It could be overkill and either of these alone might be sufficient to hold the styrene in place, but I didn’t want to risk it.
Next I removed the backing from the exposed side of Velcro. Working carefully, I placed one edge of the styrene along the wood piece and curved the styrene into the corner slowly, making contact with the Velcro in the right locations. Be careful because the Velcro will stick pretty well to the styrene and there is not too much maneuvering that can be done afterwards. One last step was to put a drywall screw with washer in each lower corner below the scenery level. I let each corner set up overnight before removing the wood pieces.
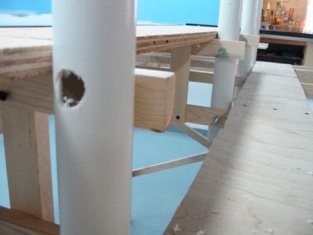
To support the backdrop, I used Mike Dodd’s idea of bolting PVC pipe to the layout to create vertical supports. It is cheaper than wood, stable and works well supporting curved styrene. I decided to make the backdrop rise 2’ above the layout, leaving about 1 foot to the ceiling. I used 2” white pipe cut to be just below the top of the backdrop, I drilled holes for 3/8” bolts and then a 1” clearance hole in one side. Two bolts and washers attach from the inside of the pipe and through the benchwork joists. These are spaced about 2-3 feet apart down the center of the peninsula.
My backdrop was 2’ tall, but 12’ long, longer than the 2’ x 8’ section. I cut a 2’ x 4’ section and extended the 8’ section. To do this, cut a 4” wide splice plate and apply to the back of one section with glue. I used Plastruct Weld glue, smelly but effective! Add glue to the other side of the splice plate and lay on the other piece of backdrop. Make sure the seam is as tight as possible. I used two 1” x 4”s and clamps to hold the pieces and splice plate together while drying.
Although the corner immediately looks better, there is still an .060” “step” at each edge of the styrene. I used joint compound to transition this smoothly. The idea is to have no compound on the surface of the styrene, but about 4”-5” of compound feathered out onto the drywall. Let it dry overnight and lightly sand. Also sand off any compound that it on the styrene. If there are any dips or voids in the compound, fill these in and let that dry before sanding again.
This took care of the two corners, now I turned my attention to the backdrop on the peninsula. This requires a two sided, self supporting backdrop that starts at the end of the peninsula and gently curves away from the opposite side. Each side will curve and tie into drywall.
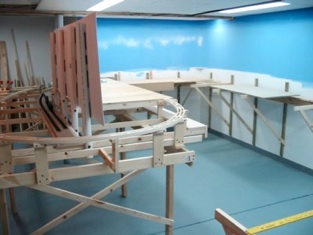
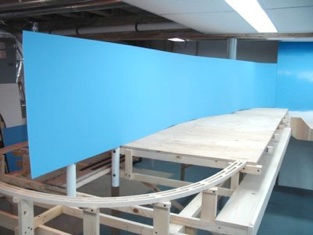
As mentioned, Mike uses self stick Velcro strips to attach the styrene to the PVC pipe. First use alcohol and a paper towel to clean each PVC pipe allowing the Velcro to stick better. Attach the Velcro but leave the outer backing in place for now. Get the long backdrop piece in place where you want it. It helps if the backdrop is resting on something, in my case the plywood of the yard. Remove one backing strip at a time, pressing the backdrop to the Velcro, working from one end to the other.
Web page written and maintained by Mike McNamara
>> Back To Articles main page
