The Northeast kingdom railroad


Custom Painting and Decaling
This article is partly about modeling a Maine Central locomotive, but mostly about taking on a type of modeling project that to some may seem intimidating. Not that this project is at all difficult; in fact that is the point.
I know that there are a number of modelers out there who do this kind of project regularly (we see their work at the conventions in the contest room). This article is not specifically for them, but for those who want to get started with a custom painting and decaling project.
September 2001
NER Coupler
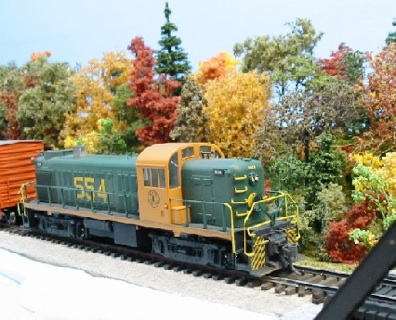
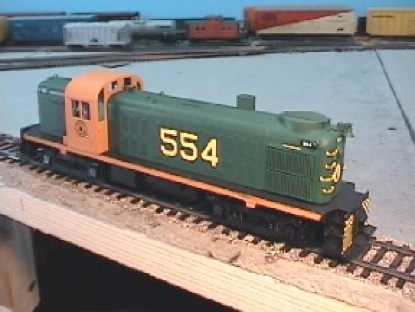
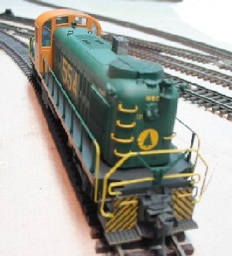
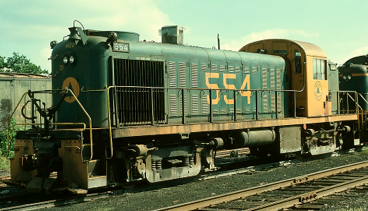
This HO Scale Kato RS2 has been custom painted and decaled. Not only did Kato not release any RS2s painted for MEC, they certainly would not choose this scheme, a one of a kind style applied for only a few years to #554. A custom paint and decal job is the only way to get equipment like this on your model railroad.
As Superintendent of the New Jersey Division MER, I've had the chance to meet and speak to many local modelers. Most do not take model railroading to the next level beyond buying ready to run or simple pre-decorated kits and using them on their layouts. These aren't necessarily beginning modelers, they just don't feel that they have the skills to successfully complete a more involved project. If you are such a modeler, I urge you to give it a try. At one point, everyone had to start from the beginning, but after a little while, everyone can be an "expert".
The rewards are many and I think you'll be encouraged by your efforts. In fact you may want to bring your project to the next Regional Convention and place it in the model contest. Seriously. Remember, the model contest is about entering, not winning. If you enter, you've already won.
If you are still wary to try a custom detailing, painting and decaling project, let me ask you this: how many articles have you read in MR or RMC about doing this kind of project? There is usually 1 or more per issue, so if you've read them, you probably already know what you need to take on this kind of project. Now it is just a matter of doing it!
To get started, I recommend first picking up Kalmbach's book "How to Paint and Weather Railroad Models". It is a good investment, explaining what you need to get started and the basic techniques. An article in the October 1999 MR also covered the same topic, but with much less detail.
When I decided that I wanted to do these types of projects a few years ago, I purchased a Badger 150 double action airbrush and Paasche compressor. You can choose what seems comfortable for you and fits your budget. And don't be afraid to ask other NER and local Division members for their input, that is one of the key advantages to your membership! You'll also need an air hose from the compressor to the airbrush.
For paint, I stick with Polly Scale. It is sprays well and is water based, so cleanup is easy. I paint outside and don't have a spray booth. This would be nice to have and also allow me to paint when the weather is cold outside. But for now, this setup works for me. Don't get delayed thinking you need to install a paint booth, exhaust fan, tubing and a special vent to the outside. This will only keep you from working on the project at hand. A piece of plywood on sawhorses in the backyard will at least get you started.
I purchased an air mask at Home Depot. Even though I am outside, I still don't want to breathe any paint particles. I also wear safety glasses. A painting handle from G&B to hold my models (see the Walther's catalog) completed my basic painting setup.
After a little practice on some pieces of cardboard, I understood how the airbrush worked and was able to use it effectively. I was ready to go!
If you are just starting out, try a simple boxcar with a small amount of lettering and only one color to paint. Wash the model with soap and water and allow it to dry.
I diluted my paint with Polly Scale Thinner as recommended. This is a critical step that helps the paint spray on lightly and evenly.
The Kalmbach book explains the basics of painting fairly well. In a nutshell, you want to hold the model about 6 inches away from the airbrush. Start spraying away from the model and then move the airbrush across the model, stopping the spray after a complete pass. The paint should go on lightly and start to dry immediately. If it looks too wet, you are too close to the model. If the surface looks rough and grainy, you are too far away. Repeat to cover the side lightly. Move to other areas to apply an initial coat. You do not need to coat the model completely right away. Set it down and let it air dry for a few minutes, then apply some more paint. You should be able to get a complete coat on the model in one painting session. Set it aside to dry for a few days.
One thing I like to do is paint multiple models at one time. I prepare a number of cars and locomotives and then group them by paint color. I paint from lightest to darkest color, cleaning the airbrush between colors by spraying from a jar with water in it. When done, then I thoroughly clean the airbrush as recommended in the manufacturers instructions.
Another key to success is to spray a gloss coat after the initial paint dries for a few days. This provides a smooth surface that will allow the decals to blend into the model. Again, I use Polly Scale, diluting the gloss coat with some distilled water as recommended for spraying.
For decaling, I soak the decals in distilled water, which will not have some of the impurities in it that tap water may have. Follow the manufacturers directions about how long to soak the decal and what setting solution to use. Work slowly and you shouldn't have any problems. You do not need to finish the decaling in one setting. In fact, it is best to do one side and let it sit before moving onto the other side. Don't forget to add all the appropriate small informational lettering, ACI plates, consolidated lube stencils, etc. that truly make a custom painted model more detailed and interesting than the standard pre-painted model.
Let the decals set overnight and then carefully rinse the model off in water to remove any setting solution. Let it dry and then spray the model with Dullcote or Polly Scale flat finish and you have a custom painted car or locomotive for your railroad. Weather it as you'd like and put the model in service on your layout!
Oh, one last thing: pat yourself on the back for completing this project. If you had a good time doing this, I'm sure you're already planning your next project.
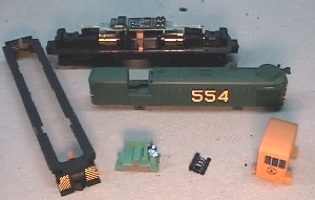
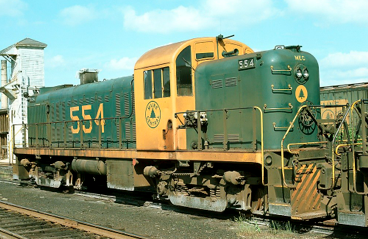
Now, if you want to model Maine Central RS2 #554, here's what I did. I started with an undecorated Kato RS2 model. This is not an exact match for the phase of RS2's that the MEC owned. The key differences are the fuel tank size and the orientation of the exhaust stack. I chose to live with these discrepancies in favor of having a Kato model to operate on my layout.
I removed the hood, cab and walkway from the mechanism. I first added details to the hood. Cal Scale #119 Marker Lamps and a Custom Finishing B-113 Bell were added to the long hood end. Both headlights were converted to dual beam using Detail Associates 1102 headlights. Over top of the radiator fan, I installed a section of Detail Associates Roof Walk, cut to size resting on scale 2 x 8 styrene pieces at each end. I also installed the lift rings and horns supplied by Kato, but left off the number boards, brakewheel, grab irons and handrails for now.
The hood is painted MEC Pine Green, while the cab and the sides of the walkways are MEC Harvest Gold. The walkways, steps and ends are black. After allowing to dry a couple days, I sprayed Polly Scale Gloss Coat to provide a smooth surface for the decals. I then let this dry a couple of days.
For decals, Microscale set 87-958 has what is needed, plus will letter a few other models as well. The color seems a bit too yellow, but not too far off. I started by applying the "554" to the hood. I followed the Microscale directions, dipping the decal in water for 10 seconds and then letting it sit for a minute. I applied a pool of Micro-Set liquid and slid the decal into the model. When positioned, I carefully applied Micro-Sol to the edges and on top. Then I let this sit to dry. Any air bubbles were pierced with an Xacto knife and more Micro-Sol applied. I repeated this process for the remaining decals, using the Microscale drawing as well as pictures from the Maine Central "In Color" books.
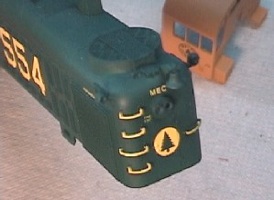
For the Pine Tree Logos on the ends, the outer ring should be cut away. At least one person has indicated that the logo was applied to the short hood end under the brakewheel, so I installed it. Don't forget the white numbers on the black number boards. After drying overnight, I carefully washed the model with water to remove any residue from the decals.
For finishing touches, the cab interior was painted Penn Central Light Green and an engineer was placed on the seat. Install the number boards. I tried painting the grab irons yellow prior to installing, but some of the paint flaked off and I had to touch them up. So it might be best to paint them after installation. Paint the handrails green with yellow around the ends and steps. Add one Detail Associates 1508 MU hose to the ends. With all of the parts applied, I sprayed the model with flat finish.
Reinstall the window glazing and place the cab back on the hood. A drop in decoder for the RS2 from Tony's Train Exchange made for an easy conversion to DCC. For the headlights, I may swap out the yellow LEDs for white ones in the future (a part number is indicated with the decoder documentation). I reassembled the model, and lightly weathered it with some dust from below and soot from above, preserving a recently outshopped look.
That's it! Not too difficult a project given the simplified scheme on this locomotive. I plan to bring it to the Albany Convention this fall so you can look at it firsthand.
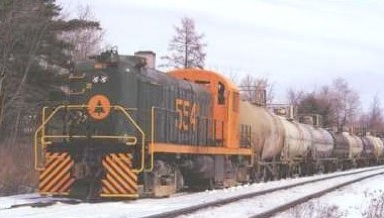
This is an elusive rear view shot of #554. I did not come across this photo until after my model was complete. It shows where the proper placement of the pine tree herald belongs. I will need to modify my model, raising the logo above the brakewheel, if I want it to match!
(Click on images for larger view at railpictures.net)
This is the first article I wrote for the NER Coupler. It provides information for those who want to custom paint and decal model railroad equipment. It also has some specific information for painting an HO scale Maine Central RS2 554 in the experimental scheme. This article was published in the September 2001 issue of the Coupler.
Web page written and maintained by Mike McNamara
>> Back To Articles main page
